
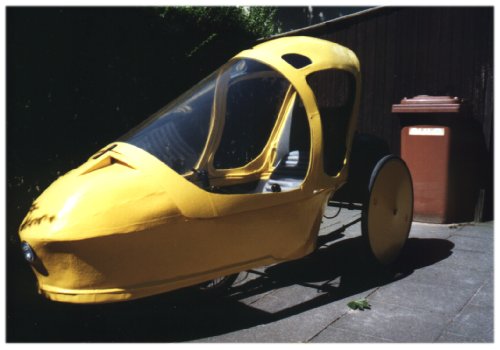
My Forelle with fairing
Do you know those ugly fairings some recumbent riders use in races? They are made from camping kipmats (rollmats or foamlite pad in the US) stuck together with tape and no attention paid to how they look. Urgh! A fairing for daily use has to look much better and last longer. So we have to glue something onto the surface of this mat-fairing. Best is waxed-cotton, not the original one but the cotton with a plastic surface. These are tablecloths that are very easy to clean. They are available in different solid colors or with flowers, if you like ;-).
We add a frame made from aluminum tubes and get a good fairing.
Aluminum tubes are available in sizes of 12x1mm (1/2") diameter for the mainframe and 10x1mm (next less then 1/2") diameter for the top frame. I glue metal on metal with Loctite, Epoxy also will do well. Waxed-cotton on the kipmat I glue with Pattex or any other instant glue.
The fairing has to look great and getting in and out has to be easy.
I decided to build a fixed fairing with a top frame that can be opened and closed or completely removed.
If you have an above-seat-steering you enter behind the steering. You should be able to open the top frame to the back or to the side. With Under-Seat-Steering, a top frame that opens to the front is best. I decided to build this, see photos. The stepover should not be higher than 50cm (20") for easy handling.
You have to decide wether you bring your head into the frame or not. Having your head inside the fairing can cause problems with view in rain and darkness.
To start, you need an initial fixed point above the bottom bracket shell, at least 5cm (2") above your feet. If this is too high make it to the front instead. Now you have to think about how to realize the fixed point. You can take a tube and weld or braze it on the top of your bottom bracket. Or your simply take a slice of steel, 1mm (1/25") thick and cut it like shown in fig.1. This you can fix to your bottom bracked shell.
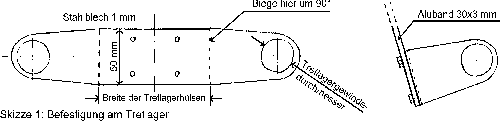
Take a band of Aluminum, 3mm (1/8") thick, 30mm (1 1/4 ") widht and 1 meter (40") long or longer, fix it to your bottom bracked with some screws (shown in fig.1, right side and in some photos) and bend it to the back with a 12mm (1/2") diameter at that point you need your fixed point. The free end you have to fix to your bikes main frame e.g. with a metal tie. Drill two holes 10mm ( little less than 1/2") like shown in fig.2. You will fix your main frame tube to this point later on with a radiator clamp.

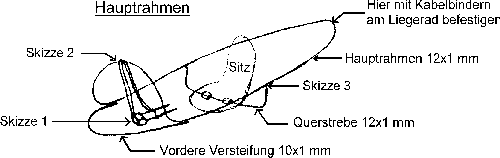
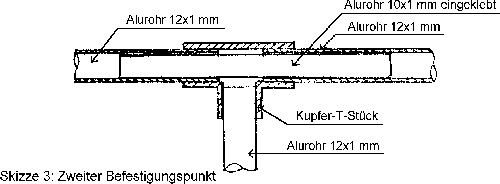
The next fixed point for the main frames is under the seat. Fix an aluminum tube 12x1 (1/2") here (see middle tube in the first figure) using some pieces of wood or plastic and some screws. At the widest point of the fairing, bend the ends up and cut them at a height of 20 inches. To these ends, glue a copper plumbing tee as shown in fig. 3.
The last fixed point is in the very back. Fix the main frames tube here with cable ties later.
An aluminum tube 12x1 (you should know what it is in inch now :) is best for the main frame. It should be around 2 meters (80") long. Mark the middle and bend it on an old bikewheel forming a U. Fix it in the middle to the first fixed point in the front (fig. 2 again).
Glue the ends of the tube into the copper tees at the middle fixed points. Glue a piece of tube 10x1, 10 cm (4") long into this construction (fig. 3) and add the back part of the main frame in the same way. Now your fairing should look similar to the first photo.
Take this construction for some rides to test it before you continue. One of the advantages of this fairing construction is that you can go on riding your bike at any time even if you are not finished.
Now add an aluminum tube 10x1 in the front like shown in the first figure. Take care that you have plenty of room for your feet.
The next step is to glue the rollmat to your main frame with Pattex. See the pictures for advice.
The most difficult thing to do follows now: You have to glue the waxed cotton to the mat. Cut it into pieces if necessary to get a good surface. You must be careful to add a very thin layer of Pattex to the whole surface of the mat and the cottons backside. Start at difficult edges of your fairing (e.g. airholes), then go on from the back to the front.

buildup 1 44KB |

buildup 2 33KB |

buildup 3 39KB |

buildup 4 34KB |

Now we can add the top frame. I built it in two sections, one in the front for getting in and one in the back that's fixed, but removeable. We have to find out a good position for the line where both sections meet. Make sure you will have a good sight to the street, this area will be around 10cm (4") wide.

top frame 1 35KB |

top frame 2 45KB |
After you bend the front section, fix it to the main frame with some cable ties. Do the same with the back section. Take four hinges size 20x30mm (1x1,25"), separate them into pieces and put them back together with homemade pins shown in fig.4:

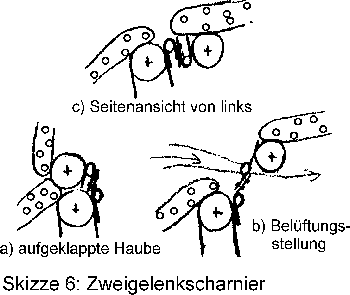
Pop-rivet the four hinges between the main frame and the back section of the top frame to fix them together. Cut the cable ties. Now it is possible to easily remove the back section by pulling the pins out. The front section of the top frame is fixed with a larger front hinge. Use a pin here to make it removeable, too. A better front hinge is a double hinge: (fig.6) You can get an additional airflow.
Glue the kipmat and the waxed cotton into place. See the pictures for further advice.

top frame 3 41KB |

top frame 4 43KB |

fairing 1 34KB |

fairing 2 38KB |

fairing 3 39KB |

fairing 4 34KB |
Have fun with your fairing!
© August 1997, by Wolfgang Bion
my URL is http://www.liegerad-online.de
